해당 포스트에서는 데이터 입력 파이프라인을 빌드하기 위한 텐서플로우의 API들을 알아볼 것이다. 갑자기 시작부터 어려운 단어가 나왔다. 데이터 입력 파이프라인? 필자가 생각하기에는 데이터가 쌩짜배기로 모델에 주입되는 것이 아니라, 적합한 형태(shape)으로 변환되어야 주입되는데, 이 과정을 전처리하기 위한 과정이라고 생각한다. 그럼 지금부터 하나씩 알아보자.
우선 데이터셋의 shape를 직관적으로 이해하기 위해서는 다음과 같은 함수가 필요하다. 미리 정의해두고 시작하자.
def show_dataset_shape(dataset):
    dataset_to_numpy = list(dataset.as_numpy_iterator())
    shape = tf.shape(dataset_to_numpy)
    print(shape)
tf.data.Dataset.from_tensor_slices
import numpy as np
import tensorflow as tf

a = np.arange(24)
t1 = tf.data.Dataset.from_tensor_slices(a)

print(t1)
>>>
<TensorSliceDataset shapes: (), types: tf.int32>

show_dataset_shape(t1)
>>>
tf.Tensor([24], shape=(1,), dtype=int32)
넘파이 배열 혹은 리스트와 같은 iterables를 데이터셋 형태로 변환하기 위한 함수이다.
tf.expand_dims
t2 = tf.expand_dims(a, 0)
t3 = tf.expand_dims(a, 1)

print(t2)
>>>
<tf.Tensor: shape=(1, 24), dtype=int32, numpy=
array([[ 0,  1,  2,  3,  4,  5,  6,  7,  8,  9, 10, 11, 12, 13, 14, 15,
        16, 17, 18, 19, 20, 21, 22, 23]])>

print(t3)
>>>
<tf.Tensor: shape=(24, 1), dtype=int32, numpy=
array([[ 0],
       [ 1],
       [ 2],
       [ 3],
       [ 4],
       [ 5],
       [ 6],
       [ 7],
       [ 8],
       [ 9],
       [10],
       [11],
       [12],
       [13],
       [14],
       [15],
       [16],
       [17],
       [18],
       [19],
       [20],
       [21],
       [22],
       [23]])>
인자로 iterables와 확장을 원하는 차원을 전달하면 된다.
batch
ds = tf.data.Dataset.range(8)
print(list(ds.as_numpy_iterator()))
>>>
[0, 1, 2, 3, 4, 5, 6, 7]

ds1 = ds.batch(3, drop_ramainder=False)
ds2 = ds.batch(3, drop_remainder=True)

for d in ds1:
	print(d)
>>>
tf.Tensor([0 1 2], shape=(3,), dtype=int64)
tf.Tensor([3 4 5], shape=(3,), dtype=int64)
tf.Tensor([6 7], shape=(2,), dtype=int64)

for d in ds2:
	print(d)
>>>
tf.Tensor([0 1 2], shape=(3,), dtype=int64)
tf.Tensor([3 4 5], shape=(3,), dtype=int64)
batch 함수의 첫 번째 인자는 배치당 크기, 두 번째 인자는 남은 요소로 이루어진 배치를 버릴지 여부이다. ds1의 경우에는 drop_remainder가 False이기 때문에 남은 요소(6, 7)로 이루어진 배치가 존재하지만, ds2의 경우에는 해당 배치를 버린것이다.
window
ds = tf.data.Dataset.range(10)
ds3 = ds.window(5, shift=1, drop_remainder=False)
ds4 = ds.window(5, shift=1, stride=2, drop_remainder=False)
ds5 = ds.window(5, shift=1, stride=2, drop_remainder=True)


for d in ds3:
    print(list(d.as_numpy_iterator()))
>>>
[0, 1, 2, 3, 4]
[1, 2, 3, 4, 5]
[2, 3, 4, 5, 6]
[3, 4, 5, 6, 7]
[4, 5, 6, 7, 8]
[5, 6, 7, 8, 9]
[6, 7, 8, 9]
[7, 8, 9]
[8, 9]
[9]

for d in ds4:
    print(list(d.as_numpy_iterator()))
>>>
[0, 2, 4, 6, 8]
[1, 3, 5, 7, 9]
[2, 4, 6, 8]
[3, 5, 7, 9]
[4, 6, 8]
[5, 7, 9]
[6, 8]
[7, 9]
[8]
[9]


for d in ds5:
    print(list(d.as_numpy_iterator()))
>>>
[0, 2, 4, 6, 8]
[1, 3, 5, 7, 9]
ds3는 5크기의 윈도우가 1칸씩 이동한 것을 의미한다. ds4는 stride가 2이기 때문에 원소마다 2의 간격을 유지하고 있으며, 5크기의 윈도우가 1칸씩 이동한 것이다. ds5는 batch의 drop_remainder와 마찬가지로 남은 요소들로 이루어진 것들을 버린것이다.
flat_map
ds = tf.data.Dataset.range(10)
ds = ds.window(5, shift=1, drop_remainder=True)
ds = ds.flat_map(lambda d: d.batch(3))

for d in ds:
    print(d)
>>>
tf.Tensor([0 1 2], shape=(3,), dtype=int64)
tf.Tensor([3 4], shape=(2,), dtype=int64)
tf.Tensor([1 2 3], shape=(3,), dtype=int64)
tf.Tensor([4 5], shape=(2,), dtype=int64)
tf.Tensor([2 3 4], shape=(3,), dtype=int64)
tf.Tensor([5 6], shape=(2,), dtype=int64)
tf.Tensor([3 4 5], shape=(3,), dtype=int64)
tf.Tensor([6 7], shape=(2,), dtype=int64)
tf.Tensor([4 5 6], shape=(3,), dtype=int64)
tf.Tensor([7 8], shape=(2,), dtype=int64)
tf.Tensor([5 6 7], shape=(3,), dtype=int64)
tf.Tensor([8 9], shape=(2,), dtype=int64)
flat_map은 데이터셋의 각 요소마다 lambda 함수를 적용한 뒤, 해당 결과들을 flatten하게 펼쳐서 보관한다.

직관적인 이해를 위해 그림을 그려봤다. 초록색으로 1~3단계로 나뉘었는데, 1단계는 window() 함수이다. 2~3단계는 flat_map() 함수인데, 각 요소에 대해 lambda d: batch(3)을 적용한 후, flatten과정을 거쳤기 때문에 for문을 통해 길이가 3, 2인 요소들이 반복적으로 나오는 것이다. 보통 window() 함수를 사용한 뒤에 batch()에 3이 아닌 윈도우의 크기만큼 전달하여 각 윈도우들을 배치로 만드는것 같다. 이 얘기는 map에서 살펴보겠다.
map
window_size = 5
ds = tf.data.Dataset.range(10)
ds = ds.window(window_size, shift=1, drop_remainder=True)
ds = ds.flat_map(lambda d: d.batch(window_size))
ds = ds.shuffle(buffer_size=10)
ds = ds.map(lambda x: (x[:-1], x[-1:]))

for x, y in ds:
    print(f'train : {x}, label : {y}')

>>>
train : [0 1 2 3], label : [4]
train : [5 6 7 8], label : [9]
train : [2 3 4 5], label : [6]
train : [1 2 3 4], label : [5]
train : [4 5 6 7], label : [8]
train : [3 4 5 6], label : [7]
flat_map에서 얘기했던대로 d.batch(window_size) 즉, 배치 하나의 사이즈를 윈도우 크기로 지정한다. (윈도우 하나를 배치로 지정하겠다는 의미) shuffle은 이름에서 알수있듯이 무작위로 섞는 것인데, 버퍼의 사이즈를 입력의 크기보다 크게해주라고 한다. 자세한 내용은 공식홈페이지를 참고. 마지막으로, map 또한 우리가 아는 python의 map과 매우 유사한데 (실은 똑같음) 각 요소마다 lambda 함수를 적용해준다.
tf.data.Dataset.zip
a1 = tf.data.Dataset.from_tensor_slices(np.arange(0, 10))
a2 = tf.data.Dataset.from_tensor_slices(np.arange(10, 20))

z = tf.data.Dataset.zip((a1, a2))

for v1, v2 in z:
	print(v1, v2)
>>>
tf.Tensor(0, shape=(), dtype=int32) tf.Tensor(10, shape=(), dtype=int32)
tf.Tensor(1, shape=(), dtype=int32) tf.Tensor(11, shape=(), dtype=int32)
tf.Tensor(2, shape=(), dtype=int32) tf.Tensor(12, shape=(), dtype=int32)
tf.Tensor(3, shape=(), dtype=int32) tf.Tensor(13, shape=(), dtype=int32)
tf.Tensor(4, shape=(), dtype=int32) tf.Tensor(14, shape=(), dtype=int32)
tf.Tensor(5, shape=(), dtype=int32) tf.Tensor(15, shape=(), dtype=int32)
tf.Tensor(6, shape=(), dtype=int32) tf.Tensor(16, shape=(), dtype=int32)
tf.Tensor(7, shape=(), dtype=int32) tf.Tensor(17, shape=(), dtype=int32)
tf.Tensor(8, shape=(), dtype=int32) tf.Tensor(18, shape=(), dtype=int32)
tf.Tensor(9, shape=(), dtype=int32) tf.Tensor(19, shape=(), dtype=int32)
a1은 [0, 9], a2는 [10, 20]의 데이터셋이다. zip()도 map()과 마찬가지로 python의 zip()함수와 유사하다. 굳이 한번더 설명하자면, 두 iterables의 같은 인덱스의 요소들을 묶어주는 역할을 한다. 지금은 1차원 배열이 2개밖에 없으니까 쉬워보이지만, 2차원 배열이 두개가 있으면 슬슬 머리가 아파오기 시작한다.
a3 = tf.data.Dataset.from_tensor_slices(np.arange(0, 12).reshape((3, 4)))
a4 = tf.data.Dataset.from_tensor_slices(np.arange(12, 24).reshape((3, 4)))

show_dataset_shape(a3)
>>>
tf.Tensor([3 4], shape=(2,), dtype=int32)

show_dataset_shape(a3)
>>>
tf.Tensor([3 4], shape=(2,), dtype=int32)

z2 = tf.data.Dataset.zip((a3, a4))
show_dataset_shape(z2)
>>>
tf.Tensor([3 2 4], shape=(3,), dtype=int32)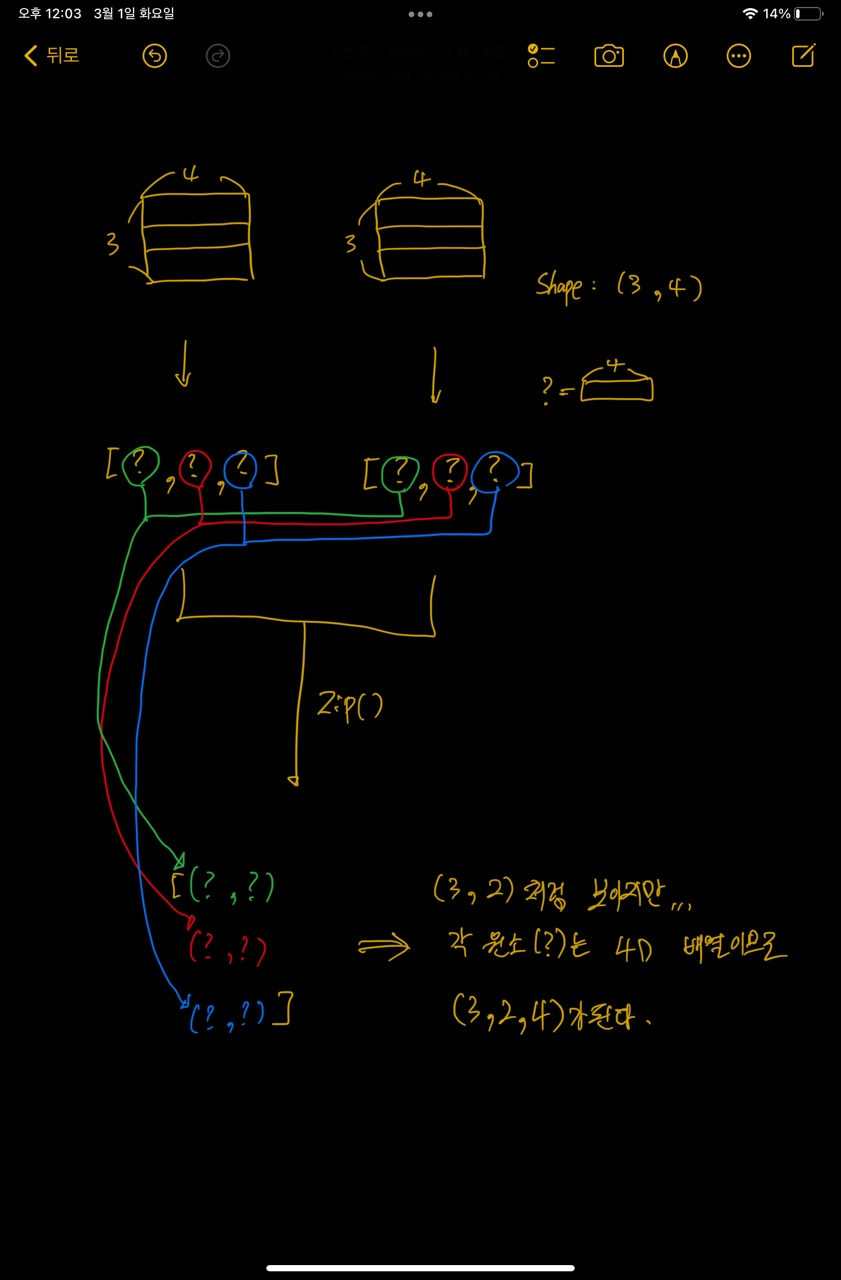
필자는 멍청해서 그림을 그리지 않으면 잘 이해가 안되더라.. a3와 a4 배열은 각각 shape이 (3, 4)인 2차원 배열이다. 하지만 인간의 뇌로는 고차원을 생각하기 어려우므로.. 마지막 axis(4)의 요소는 하나의 원소(그림에서는 '?'로 표시했다.)로 생각하고 shape이 (3,)인 1차원 배열이라 생각하자. shape이 (3,)인 두 배열을 zip하게 되면 (3, 2) 배열이 된다. 하지만 우리는 사실 치환을 한것이기 때문에 환원을 하면 (3, 2, 4) shape의 배열이 나온다.
여기서 알 수 있는 사실은 몇 차원 배열이든간에 첫 번째 axis 이후의 차원으로는 전부다 하나의 값으로 치환해서 생각하면 된다. 예를 들어, (3, 4, 5, 6, 7) shape의 두 배열이 있다고 가정해보자. 첫 번째 axis (3) 이후의 차원 (4, 5, 6, 7)을 하나의 값으로 생각하면 결국 (3,) 배열을 푸는것이랑 동일하다. 즉, 첫 번째 axis 이후의 차원은 전부 무시하고 풀라고... (이거 하나 이해할라고 삽질 오지게함)
.
.
.
※ 추후에 새로 알게되는 api가 있으면 해당 포스트에 계속 추가할 예정입니다.
참고
https://www.tensorflow.org/guide/data?hl=ko
tf.data: TensorFlow 입력 파이프라인 빌드 | TensorFlow Core
tf.data: TensorFlow 입력 파이프라인 빌드 tf.data API를 사용하면 간단하고 재사용 가능한 조각으로 복잡한 입력 파이프라인을 빌드할 수 있습니다. 예를 들어, 이미지 모델의 파이프라인은 분산된 파
www.tensorflow.org
https://www.tensorflow.org/api_docs/python/tf/data/Dataset
tf.data.Dataset | TensorFlow Core v2.8.0
Represents a potentially large set of elements.
www.tensorflow.org
https://stackoverflow.com/questions/56218014/how-to-acquire-tf-data-datasets-shape
How to acquire tf.data.dataset's shape?
I know dataset has output_shapes, but it shows like below: data_set: DatasetV1Adapter shapes: {item_id_hist: (?, ?), tags: (?, ?), client_platform: (?,), entrance: (?,), item_id: (?,), lable: (?...
stackoverflow.com
'[Framework] - Tensorflow' 카테고리의 다른 글
| # 1. tf.keras.backend.permute_dimensions (0) | 2022.03.17 |
|---|

댓글